Client API
The FLARE Client API provides an easy way for users to convert their centralized, local training code into federated learning code with the following benefits:
Only requires a few lines of code changes, without the need to restructure the code or implement a new class
Reduces the number of new FLARE specific concepts exposed to users
Easy adaptation from existing local training code using different frameworks (PyTorch, PyTorch Lightning, HuggingFace)
Core concept
The general structure of the popular federated learning (FL) workflow, “FedAvg” is as follows:
FL server initializes an initial model
For each round (global iteration):
FL server sends the global model to clients
Each FL client starts with this global model and trains on their own data
Each FL client sends back their trained model
FL server aggregates all the models and produces a new global model
On the client side, the training workflow is as follows:
Receive the model from the FL server
Perform local training on the received global model and/or evaluate the received global model for model selection
Send the new model back to the FL server
To convert a centralized training code to federated learning, we need to adapt the code to do the following steps:
Obtain the required information from received FLModel
Run local training
Put the results in a new FLModel to be sent back
For a general use case, there are three essential methods for the Client API:
init(): Initializes NVFlare Client API environment.receive(): Receives model from NVFlare side.send(): Sends the model to NVFlare side.
Users can use the Client API to change their centralized training code to federated learning, for example:
import nvflare.client as flare

flare.init() # 1. Initializes NVFlare Client API environment.
input_model = flare.receive() # 2. Receives model from NVFlare side.
params = input_model.params # 3. Obtain the required information from received FLModel

# original local training code begins
new_params = local_train(params)
# original local training code ends

output_model = flare.FLModel(params=new_params) # 4. Put the results in a new FLModel
flare.send(output_model) # 5. Sends the model to NVFlare side.
With 5 lines of code changes, we convert the centralized training code to federated learning setting.
After this, we can utilize the job templates and the NVIDIA FLARE Job CLI to generate a job so it can be run using NVIDIA FLARE FL Simulator or submit to a deployed NVFlare system.
Below is a table overview of key Client APIs.
API |
Description |
API Doc Link |
|---|---|---|
init |
Initializes NVFlare Client API environment. |
|
receive |
Receives model from NVFlare side. |
|
send |
Sends the model to NVFlare side. |
|
system_info |
Gets NVFlare system information. |
|
get_job_id |
Gets job id. |
|
get_site_name |
Gets site name. |
|
is_running |
Returns whether the NVFlare system is up and running. |
|
is_train |
Returns whether the current task is a training task. |
|
is_evaluate |
Returns whether the current task is an evaluate task. |
|
is_submit_model |
Returns whether the current task is a submit_model task. |
API |
Description |
API Doc Link |
|---|---|---|
train |
A decorator to wraps the training logic. |
|
evaluate |
A decorator to wraps the evaluate logic. |
API |
Description |
API Doc Link |
|---|---|---|
patch |
Patches the PyTorch Lightning Trainer for usage with FLARE. |
|
API |
Description |
API Doc Link |
|---|---|---|
SummaryWriter |
SummaryWriter mimics the usage of Tensorboard’s SummaryWriter. |
|
WandBWriter |
WandBWriter mimics the usage of weights and biases. |
|
MLflowWriter |
MLflowWriter mimics the usage of MLflow. |
Please check Client API Module nvflare.client.api for more in-depth
information about all of the Client API functionalities.
If you are using PyTorch Lightning in your training code, you can check the
Lightning API Module nvflare.app_opt.lightning.api.
Client API communication patterns
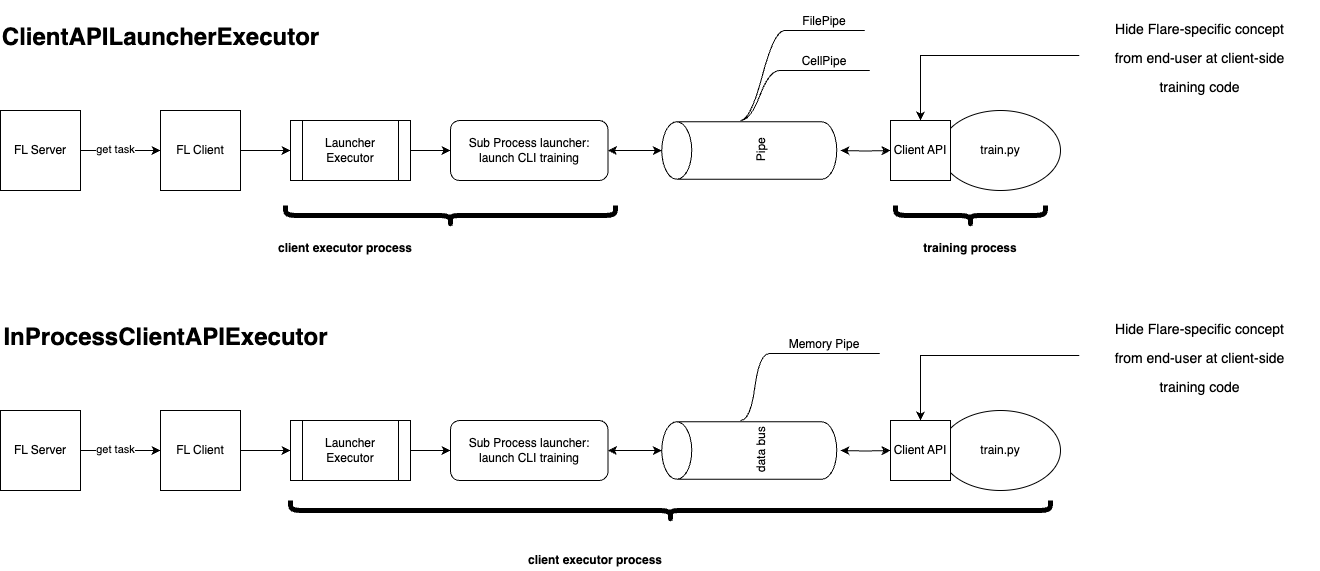
We offer various implementations of Client APIs tailored to different scenarios, each linked with distinct communication patterns.
Broadly, we present in-process and sub-process executors. The in-process executor, slated for release in NVFlare 2.5.0, entails both training scripts and client executor operating within the same process. Communication between them occurs through an in-memory databus.
On the other hand, the LauncherExecutor employs a sub-process to execute training scripts, leading to the client executor and training scripts residing in separate processes. Communication between them is facilitated by either CellPipe (default) or FilePipe.
When the training process involves either a single GPU or no GPUs, and the training script doesn’t integrate third-party training systems, the in-process executor is preferable (when available). For scenarios involving multi-GPU training or the utilization of external training infrastructure, opting for the Launcher executor might be more suitable.
Choice of different Pipes
In the 2.5.x release, for most users, we recommend utilizing the default setting with the in-process executor (defaulting to memory-based data exchanges). Conversely, in the 2.4.x release, we suggest using the default setting with CellPipe for most users.
CellPipe facilitates TCP-based cell-to-cell connections between the Executor and training script processes on the local host. The term cell represents logical endpoints. This communication enables the exchange of models, metrics, and metadata between the two processes.
In contrast, FilePipe offers file-based communication between the Executor and training script processes, utilizing a job-specific file directory for exchanging models and metadata via files. While FilePipe is easier to set up than CellPipe, it’s not suitable for high-frequency metrics exchange.
Configuration
Different configurations are available for each type of executor.
Definition lists:
- in-process executor configuration
{
  # version of the configuration
  format_version = 2

  # This is the application script which will be invoked. Client can replace this script with user's own training script.
  app_script = "cifar10.py"

  # Additional arguments needed by the training code. For example, in lightning, these can be --trainer.batch_size=xxx.
    # Additional arguments needed by the training code. For example, in lightning, these can be --trainer.batch_size=xxx.
  app_config = ""

  # Client Computing Executors.
  executors = [
    {
      # tasks the executors are defined to handle
      tasks = ["train"]

      # This particular executor
      executor {

        path = "nvflare.app_opt.pt.in_process_client_api_executor.PTInProcessClientAPIExecutor"
        args {
              task_script_path = "{app_script}"
              task_script_args = "{app_config}"

              # if the transfer_type is FULL, then it will be sent directly
              # if the transfer_type is DIFF, then we will calculate the
              # difference VS received parameters and send the difference
              params_transfer_type = "DIFF"

              # if train_with_evaluation is true, the executor will expect
              # the custom code need to send back both the trained parameters and the evaluation metric
              # otherwise only trained parameters are expected
              train_with_evaluation = true

              # time interval in seconds. Time interval to wait before check if the local task has submitted the result
              # if the local task takes long time, you can increase this interval to larger number
              # uncomment to overwrite the default, default is 0.5 seconds
              result_pull_interval = 0.5

              # time interval in seconds. Time interval to wait before check if the trainig code has log metric (such as
              # Tensorboard log, MLFlow log or Weights & Biases logs. The result will be streanmed to the server side
              # then to the corresponding tracking system
              # if the log is not needed, you can set this to a larger number
              # uncomment to overwrite the default, default is None, which disable the log streaming feature.
              log_pull_interval = 0.1

        }
      }
    }
  ],

  # this defined an array of task data filters. If provided, it will control the data from server controller to client executor
  task_data_filters =  []

  # this defined an array of task result filters. If provided, it will control the result from client executor to server controller
  task_result_filters = []

  # define this component that will help relay local metrics log to FL server.
  components =  [
      {
        "id": "event_to_fed",
        "name": "ConvertToFedEvent",
        "args": {"events_to_convert": ["analytix_log_stats"], "fed_event_prefix": "fed."}
      }
   ]
}
This configuration specifically caters to PyTorch applications, providing serialization and deserialization (aka Decomposers) for commonly used PyTorch objects. For non-PyTorch applications, the generic
InProcessClientAPIExecutorcan be employed.- subprocess launcher Executor configuration
In the config_fed_client in the FLARE app, in order to launch the training script we use the
SubprocessLaunchercomponent. The definedscriptis invoked, andlaunch_oncecan be set to either launch once for the whole job (launch_once = True), or launch a process for each task received from the server (launch_once = False)launch_oncedictates how many times the training scripts are invoked during the overall training process.When set to False, the executor essentially invokes
python <training scripts>.pyevery round of training. Typically, launch_once is set to True.A corresponding
LauncherExecutoris used as the executor to handle the tasks and perform the data exchange using the pipe. For the Pipe component we provide implementations ofFilePipeandCellPipe.{ # version of the configuration format_version = 2 # This is the application script which will be invoked. Client can replace this script with user's own training script. app_script = "cifar10.py" # Additional arguments needed by the training code. For example, in lightning, these can be --trainer.batch_size=xxx. app_config = "" # Client Computing Executors. executors = [ { # tasks the executors are defined to handle tasks = ["train"] # This particular executor executor { # This is an executor for Client API. The underline data exchange is using Pipe. path = "nvflare.app_opt.pt.client_api_launcher_executor.PTClientAPILauncherExecutor" args { # launcher_id is used to locate the Launcher object in "components" launcher_id = "launcher" # pipe_id is used to locate the Pipe object in "components" pipe_id = "pipe" # Timeout in seconds for waiting for a heartbeat from the training script. Defaults to 30 seconds. # Please refer to the class docstring for all available arguments heartbeat_timeout = 60 # format of the exchange parameters params_exchange_format = "pytorch" # if the transfer_type is FULL, then it will be sent directly # if the transfer_type is DIFF, then we will calculate the # difference VS received parameters and send the difference params_transfer_type = "DIFF" # if train_with_evaluation is true, the executor will expect # the custom code need to send back both the trained parameters and the evaluation metric # otherwise only trained parameters are expected train_with_evaluation = true } } } ], # this defined an array of task data filters. If provided, it will control the data from server controller to client executor task_data_filters = [] # this defined an array of task result filters. If provided, it will control the result from client executor to server controller task_result_filters = [] components = [ { # component id is "launcher" id = "launcher" # the class path of this component path = "nvflare.app_common.launchers.subprocess_launcher.SubprocessLauncher" args { # the launcher will invoke the script script = "python3 custom/{app_script} {app_config} " # if launch_once is true, the SubprocessLauncher will launch once for the whole job # if launch_once is false, the SubprocessLauncher will launch a process for each task it receives from server launch_once = true } } { id = "pipe" path = "nvflare.fuel.utils.pipe.cell_pipe.CellPipe" args { mode = "PASSIVE" site_name = "{SITE_NAME}" token = "{JOB_ID}" root_url = "{ROOT_URL}" secure_mode = "{SECURE_MODE}" workspace_dir = "{WORKSPACE}" } } { id = "metrics_pipe" path = "nvflare.fuel.utils.pipe.cell_pipe.CellPipe" args { mode = "PASSIVE" site_name = "{SITE_NAME}" token = "{JOB_ID}" root_url = "{ROOT_URL}" secure_mode = "{SECURE_MODE}" workspace_dir = "{WORKSPACE}" } }, { id = "metric_relay" path = "nvflare.app_common.widgets.metric_relay.MetricRelay" args { pipe_id = "metrics_pipe" event_type = "fed.analytix_log_stats" # how fast should it read from the peer read_interval = 0.1 } }, { # we use this component so the client api `flare.init()` can get required information id = "config_preparer" path = "nvflare.app_common.widgets.external_configurator.ExternalConfigurator" args { component_ids = ["metric_relay"] } } ] }
For example configurations, take a look at the job_templates directory for templates using the launcher and Client API.
Note
In that case that the user does not need to launch the process and instead has their own existing external training system, this would involve using the 3rd-Party System Integration, which is based on the same underlying mechanisms.
Examples
For examples of using Client API with different frameworks, please refer to examples/hello-world/ml-to-fl.
For additional examples, also take a look at the step-by-step series that use Client API to write the train script.
Selection of Job Templates
To help user quickly setup job configurations, we create many job templates. You can pick one job template that close to your use cases and adapt to your needs by modify the needed variables.
use command nvflare job list_templates you can find all job templates nvflare provided.
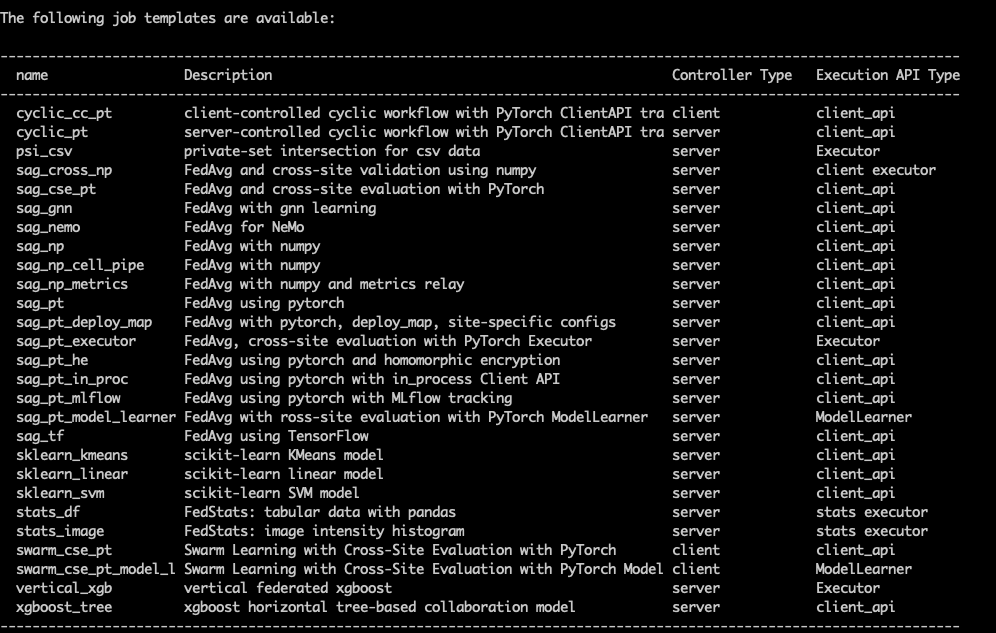
looking at the Execution API Type, you will find client_api. That’s indicates the specified job template will use
Client API configuration. You can further nail down the selection by choice of machine learning framework: pytorch or sklearn or xgboost,
in-process or not, type of models ( GNN, NeMo LLM), workflow patterns ( Swarm learning or standard fedavg with scatter and gather (sag)) etc.