3rd-Party System Integration
NVFLARE supports a seamless integration between the FLARE system and a third-party external training system. This is especially useful with pre-existing ML/DL training system infrastructure that cannot be easily adapted to the FLARE client.
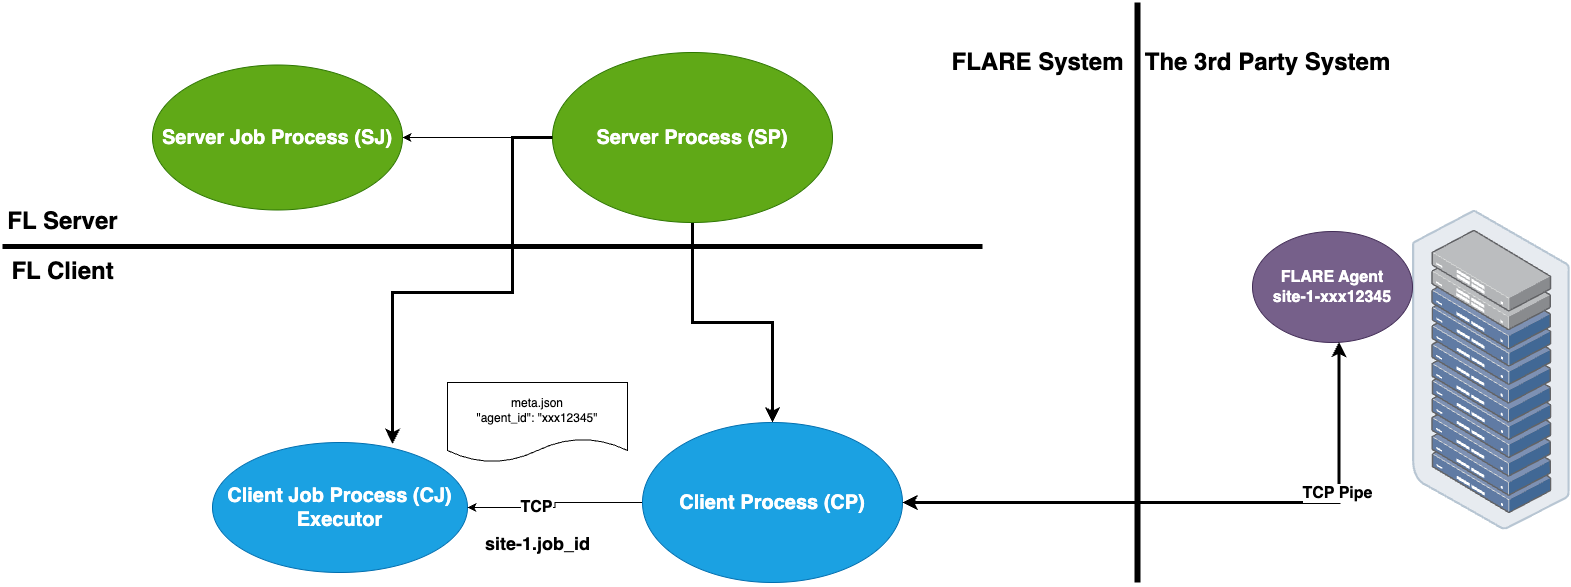
The FL Client uses the TaskExchanger
executor to receive tasks, and submit results to the FLARE server.
The 3rd-party system uses the FlareAgent to
interact with the TaskExchanger to get tasks and submit results.
This integration pattern is illustrated in the diagram below:
Requirements
The key to enabling this integration is the “agent_id” that must be made known to both systems. The FL client gets this information from the job’s config_fed_client, and the 3rd-party trainer gets this from its own launch process.
It is assumed that the customer already has a way to dynamically generate the “agent_id” for each job, and start its trainer process with this information.
Each FL client must be able to open an address (host:port) to allow the trainer to connect to. Depending on where the trainer is running, the connection may or may not need to be in secure mode (TLS).
We will need to modify the “project.yml” for NVFlare provision system and generate new package folders for each participating sites
The trainer must be a Python program that can integrate with the NVFLARE library.
The trainer must be able to connect to the server, as well as the address that is dynamically opened by the FL client.
Prepare the Trainer
Let’s prepare the trainer code first, we will modify the “project.yml” in the next section for project setup.
You need to modify your trainer code to integrate with the FlareAgent API.
This API provides simple get_task() and submit_result() methods to interact with the FL client.
We will go through the steps one by one:
1. Create Agent
The FlareAgent is responsible
for interacting with the FL client to exchange task data.
If using FLModel, FlareAgentWithFLModel
subclasses FlareAgent and provides conversion from shareables to task using the FLModel data structure.
If using CellPipe, a convenient class FlareAgentWithCellPipe
can be used.
Please refer to their API page for detailed explanations of each argument:
You can create the FlareAgentWithCellPipe as the following code:
from nvflare.client.flare_agent import FlareAgentWithCellPipe

agent = FlareAgentWithCellPipe(
    root_url="grpc://server:8002",
    site_name=args.site_name,
    agent_id=args.agent_id,
    workspace_dir=args.workspace,
    secure_mode=True,
    submit_result_timeout=2.0,
    heartbeat_timeout=120.0,
)
2. Start Agent
After we create the agent, we need to start it.
We can call agent.start() to start the agent.
This call must be made before trying to get tasks.
For example:
agent.start()
3. Process Tasks
The training is a continuous process of getting a task, executing the task, and submitting the task result.
Call agent.get_task() to get a Task object from the FL client.
This is a blocking call and returns only when a task is available.
If there are no more tasks available (i.e. end of the job), AgentClosed
exception will be raised, and signaling to end the training.
The Task object contains 3 pieces of
information: task_name, task_id, and data.
The task_name tells you what the task is (e.g. train).
The task_id is a UUID of the task instance.
The data contains model data to be trained on.
Once the task is completed, the result can be submitted to the FL client by calling agent.submit_result().
A return code (rc) must be provided to indicate whether the task was executed successfully.
If the rc is not RC.OK, then the job will be aborted.
For example:
while True:
    print("getting task ...")
    try:
        task = agent.get_task()
    except AgentClosed:
        print("agent closed - exit")
        break

    print(f"got task: {task}")
    rc, meta, result = train(task.data) # perform train task
    submitted = agent.submit_result(TaskResult(data=result, meta=meta, return_code=rc))
    print(f"result submitted: {submitted}")
4. Stop Agent
At the end of the training, agent.stop() must be called to end the program gracefully.
If this call is missed, the program may not exit properly.
agent.stop()
5. Putting Together
Now we learn all the necessary steps, we can put together into the following example code of this usage pattern:
import argparse
import logging

from nvflare.client.flare_agent import AgentClosed, FlareAgentWithCellPipe

NUMPY_KEY = "numpy_key"


def main():

    logging.basicConfig()
    logging.getLogger().setLevel(logging.INFO)

    parser = argparse.ArgumentParser()
    parser.add_argument("--workspace", "-w", type=str, help="workspace folder", required=False, default=".")
    parser.add_argument("--site_name", "-s", type=str, help="flare site name", required=True)
    parser.add_argument("--agent_id", "-a", type=str, help="agent id", required=True)

    args = parser.parse_args()

    # 1. create the agent
    agent = FlareAgentWithCellPipe(
        root_url="grpc://server:8002",
        site_name=args.site_name,
        agent_id=args.agent_id,
        workspace_dir=args.workspace,
        secure_mode=True,
        submit_result_timeout=2.0,
        heartbeat_timeout=120.0,
    )

    # 2. start the agent
    agent.start()

    # 3. processing tasks
    while True:
        print("getting task ...")
        try:
            task = agent.get_task()
        except AgentClosed:
            print("agent closed - exit")
            break

        print(f"got task: {task}")
        result = train(task.data)  # perform train task
        submitted = agent.submit_result(result)
        print(f"result submitted: {submitted}")

    # 4. stop the agent
    agent.stop()


def train(model):
    print(f"training on {model}")
    return model


if __name__ == "__main__":
    main()
Notes:
This pattern of (
start,get_task,submit_result, andstop) is strictly enforced. If the pattern is not followed (e.g.get_task, thenget_taskagain withoutsubmit_result), you will get aCallStateErrorexception.The only way to know that the job is ended is the
AgentClosedexception from theget_taskcall. This exception is raised when the FL client tells the agent that the job is done; or when the FL client is considered dead (missing heartbeats for the configured period of time).If your training algorithm runs into an unrecoverable error and wants to end the job, you should use a proper return code (e.g.
RC.EXECUTION_EXCEPTION).
Project Setup
After we prepare the trainer code we can follow the steps below to properly set up the project and jobs.
Step One - Provision
The FL client site will behave like both client and server for connecting from the perspective of the trainer. This requires the client site to have two sets of TLS credentials. Make sure to specify the “listening_host” for the client in the project.yml when provisioning the project.
Note
We assume you understand NVFlare provision, if not please read Provisioning in NVIDIA FLARE.
An example looks like:
participants:
# change example.com to the FQDN of the server
- name: server
  type: server
  org: nvidia
  fed_learn_port: 8002
  admin_port: 8003
- name: site_1
  type: client
  org: nvidia
  listening_host: localhost
- name: site_2
  type: client
  org: nvidia
  listening_host: localhost
Once the project is provisioned, check the “startup” kit generated for the clients. You should see the following files, among others:
client.crt, client.key, server.crt, server.key, rootCA.pem
Note that the specified listening_host of a site must be a hostname that the external trainer can reach via network.
Step Two - Prepare Job Configuration
For each job, configure the config_fed_client.json to use
TaskExchanger as the executor.
{
  "format_version": 2,
  "executors": [
      {
        "tasks": [
          "train"
        ],
        "executor": {
          "path": "nvflare.app_common.executors.task_exchanger.TaskExchanger",
          "args": {
            "pipe_id": "pipe"
            "peer_read_timeout": 30,
            "heartbeat_timeout": 60
          }
        }
      }
    ],
  "task_result_filters": [],
  "task_data_filters": [],
  components =  [
    {
      id = "pipe"
      path = "nvflare.fuel.utils.pipe.cell_pipe.CellPipe"
      args {
        mode = "PASSIVE"
        site_name = "{SITE_NAME}"
        token = "{SITE_NAME}"
        root_url = "{ROOT_URL}"
        secure_mode = "{SECURE_MODE}"
        workspace_dir = "{WORKSPACE}"
      }
    }
  ]
}
Make sure the parameters of the TaskExchanger
are configured properly, and change the default values as needed.
Please refer to the API page for a detailed explanation of each argument:
TaskExchanger
Step Three - Trainer Setup
For each client site, you will have an FL client and a trainer process.
To make our integration work, please follow the following steps to setup the trainer process on each client site:
Make sure the trainer process has access to a local file system.
Create a “workspace” folder that is going to be used by this trainer process This workspace will be used for all jobs.
Copy the “startup” folder of the client site to this “workspace” folder If needed, any additional config files required by the trainer can also be placed in this “workspace” folder.
Create the trainer script following the steps in the above section. Please set the FlareAgentWithCellPipe’s “workspace_dir” to the path of this “workspace” folder that you just created. Please make sure the “agent_id” value of FlareAgentWithCellPipe is the same as the “token” value in the above
Verification
The FL client (TaskExchanger) and your trainer process (FlareAgentWithCellPipe) do not have to be started at exactly the same time.
Whichever is started first will wait for the other for heartbeat_timeout seconds.
Once they both are started and connected, you can verify they are directly
connected using the Admin console’s cells commands.
The following example shows two clients (site-1, site-2) connected to their external trainers via the agent_id/token “ext_trainer”:
> cells
server
server.10d1d3b7-fb50-4c83-9575-e510f32c5d21
site-1
site-1.10d1d3b7-fb50-4c83-9575-e510f32c5d21
site-2
site-2.10d1d3b7-fb50-4c83-9575-e510f32c5d21
site-1_ext_trainer_active
site-2_ext_trainer_active
site-2_ext_trainer_passive
site-1_ext_trainer_passive
Total Cells: 10
The cells command lists all cells.
Notice that the job 10d1d3b7-fb50-4c83-9575-e510f32c5d21 is running on both
“site-1” and “site-2” clients.
Also notice that there are two pairs of corresponding cells (site-1_ext_trainer_active, site-1_ext_trainer_passive) and ((site-2_ext_trainer_active, site-2_ext_trainer_passive)).
Optional - Setup for Adhoc Direct Connection between FL Client and Trainer
FL client and the trainer can always talk to each other via the server, but it could be slow, especially if the server is located far away. The enable adhoc direct connections between the FL client and the trainer, configure the comm_config.json on the client site as follows:
{
  "allow_adhoc_conns": true,
  "use_aio_grpc": true,
  "adhoc": {
    "scheme": "tcp",
    "resources": {
      "host": "localhost",
      "secure": true
    }
  }
}
This file must be placed into the site’s “local” folder within its workspace.
Pay attention to the following:
For most cases, the “scheme” should be set to “tcp” to get the best performance. If “tcp” cannot be used, you can use “grpc”.
In “resources”:
If FL client and the trainer are within the same trusted network, you can set “secure” to false; otherwise set it to true.
The value of the “host” must match the “listening_host” value of the site used in provision.