Hello Flower (PyTorch)
This example demonstrates how to use NVIDIA FLARE with Flower to train an image classifier using federated averaging (FedAvg). The complete example code can be found in the hello-flower directory. It is recommended to create a virtual environment and run everything within a virtualenv.
NVIDIA FLARE Installation
For the complete installation instructions, see Installation.
pip install nvflare
Get the example code from GitHub:
git clone https://github.com/NVIDIA/NVFlare.git
Then navigate to the hello-flower directory:
git switch <release branch>
cd examples/hello-world/hello-flower
Install the dependencies:
pip install -r requirements.txt
Code Structure
hello-flower
||
||-- flwr-pt/           # Flower PyTorch app
||   |-- flwr_pt/
||   |   |-- client.py   # <-- contains `ClientApp`
||   |   |-- __init__.py # <-- to register the python module
||   |   |-- server.py   # <-- contains `ServerApp`
||   |   |-- task.py     # <-- task-specific code (model, data)
||   |-- pyproject.toml  # <-- Flower project file
||-- flwr-pt-tb/        # Flower PyTorch app with TensorBoard streaming
||   |-- flwr_pt_tb/
||   |   |-- client.py   # <-- contains `ClientApp` with TensorBoard
||   |   |-- __init__.py # <-- to register the python module
||   |   |-- server.py   # <-- contains `ServerApp`
||   |   |-- task.py     # <-- task-specific code (model, data)
||   |-- pyproject.toml  # <-- Flower project file
||-- job.py             # job recipe that defines client and server configurations
||-- requirements.txt   # dependencies
Data
This example uses the CIFAR-10 dataset.
In a real FL experiment, each client would have their own dataset used for local training.
You can download the CIFAR-10 dataset from the Internet via torchvision’s datasets module.
You can split the datasets for different clients so that each client has its own dataset.
For simplicity, the same dataset will be used on each client in this example.
Model
In PyTorch, neural networks are implemented by defining a class that extends nn.Module.
The network’s architecture is set up in the __init__ method, while the forward method determines how input data flows through the layers. For faster computations, the model is transferred to a hardware accelerator (such as CUDA GPUs) if available; otherwise, it runs on the CPU. The implementation of this model can be found in the task.py files within the Flower app directories and is based on a simple CNN adapted from “PyTorch: A 60 Minute Blitz”.
Client Code
The client code in client.py is responsible for local training and contains the Flower Client App.
Server Code
In this example, we use Flower’s built-in federated averaging Strategy.
The server code is defined in server.py within each Flower app directory.
There is no need to define customized server code for this example, as Flower provides the FedAvg implementation.
Job Recipe Code
The Job Recipe contains the Flower app configuration and deploys it within NVFlare.
recipe = FlowerRecipe(
    name="hello-flower",
    min_clients=n_clients,
    num_rounds=num_rounds,
    content_dir=content_dir,
    stream_metrics=stream_metrics,
)

env = SimEnv(num_clients=n_clients, num_threads=n_clients)
recipe.execute(env=env)
Run Job
From the terminal, run the code:
Run flwr-pt with NVFlare Simulation
This runs 2 Flower clients and a Flower server in parallel using NVFlare’s simulator.
python job.py --job_name "flwr-pt" --content_dir "./flwr-pt"
Run flwr-pt with NVFlare Simulation and TensorBoard Streaming
This runs 2 Flower clients and a Flower server in parallel using NVFlare while streaming TensorBoard metrics to the server at each iteration using NVFlare’s metric streaming.
python job.py --job_name "flwr-pt-tb" --content_dir "./flwr-pt-tb" --stream_metrics
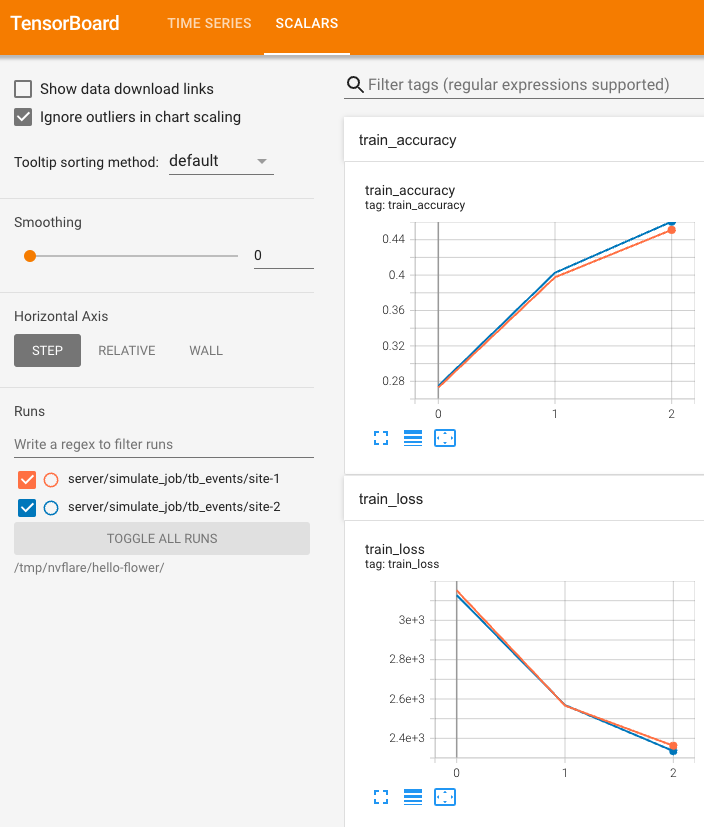
You can visualize the metrics streamed to the server using TensorBoard.
tensorboard --logdir /tmp/nvflare/hello-flower
Run with Real Deployment
First, check the deployment guide: Deployment Overview.
You can run the job in a production environment by changing from SimEnv to ProdEnv in the job.py script.
Output Summary
Initialization
TensorBoard: Logs available at
/tmp/nvflare/hello-flower.Workflow:
FlowerRecipefor NVFlare integration.Global Model Initialization: Using initial global parameters provided by the strategy.
Round 1
Model Loading: Initial model loaded from the Flower app.
Clients Sampled:
site-1,site-2.Training:
Global model parameters sent to both sites.
Flower clients perform local training with specified epochs.
Aggregation: Models aggregated and global model updated on the server.
Round 2
…
Round 3
Clients Sampled:
site-1,site-2.Training:
Similar process as Round 1.
Aggregation: Models aggregated and global model updated on the server.
Completion
FedAvg Process: Successfully finished.
Flower Integration: Seamless integration between Flower and NVFlare completed.
Print Summary:
[FLWR-SL@simulator_server] INFO :      [SUMMARY]
[FLWR-SL@simulator_server] INFO :      Run finished 3 round(s) in 87.25s
[FLWR-SL@simulator_server] INFO :            History (metrics, distributed, fit):
[FLWR-SL@simulator_server] INFO :            {'train_accuracy': [(1, 0.29286), (2, 0.39183), (3, 0.4405)],
[FLWR-SL@simulator_server] INFO :             'train_loss': [(1, 3024.705621123314),
[FLWR-SL@simulator_server] INFO :                            (2, 2582.9437326192856),
[FLWR-SL@simulator_server] INFO :                            (3, 2389.465917825699)],
[FLWR-SL@simulator_server] INFO :             'val_accuracy': [(1, 0.2988), (2, 0.3931), (3, 0.43765)],
[FLWR-SL@simulator_server] INFO :             'val_loss': [(1, 19282.4288251698),
[FLWR-SL@simulator_server] INFO :                          (2, 16474.469832401723),
[FLWR-SL@simulator_server] INFO :                          (3, 15261.50008890964)]}