Brev Kubernetes Helm Deployment
This guide walks through an end-to-end NVIDIA FLARE deployment on two Brev single-node Kubernetes environments, treated as two Kubernetes clusters:
one cluster for the FLARE server;
one cluster for a single FLARE client named
site-1.
It covers provisioning, editing project.yml, using nvflare deploy prepare
to generate Helm charts for the server and client, creating the Helm workspace
PersistentVolumeClaim (PVC) and any job data PVCs, staging the prepared folders
into the workspace PVC, and deploying the generated charts.
The Kubernetes environments are created from the Brev web UI. The exact control
labels in Brev can change, but the workflow is the same: create an environment,
select compute, switch the software configuration to Single-node Kubernetes,
open a Brev shell, copy the prepared kits to the environment, then deploy with
kubectl and helm inside each Brev environment.
Brev System Overview
Brev provides managed compute environments that can be created with CPU or GPU hardware and an optional single-node Kubernetes software configuration. In this guide, each Brev environment is used as a small independent Kubernetes cluster: one environment runs the FLARE server, and each client site runs in its own environment.
The Brev console is used to create environments, choose hardware, select
Single-node Kubernetes, and expose the FLARE server port. The Brev CLI is
used from the local workstation to copy files and open shells:
brev copyuploads each prepared participant archive.brev shellopens a shell inside a Brev environment.brev execcan run non-interactive commands after the environment is ready.
Inside each Brev Kubernetes environment, kubectl and helm operate on
that environment’s local cluster. Because the clusters are separate, using the
same Kubernetes namespace and PVC names in each cluster is safe.
The FLARE server environment needs an inbound TCP port for
fed_learn_port. Client environments usually do not need inbound FLARE
ports; they connect outbound to the server endpoint configured in
project.yml.
Assumptions
The examples use:
one server named
server1;one client named
site-1;one Brev Kubernetes environment named
nvflare-server-k8s;one Brev Kubernetes environment named
nvflare-site-1-k8s;namespace
nvflarein both clusters;workspace PVC name
nvflwsin both clusters;optional job data PVC name
nvfldatain both clusters;an externally reachable DNS name for the server, for example
server1.example.com;a container image in a registry that both clusters can pull, for example
registry.example.com/nvflare:dev.
Using the same namespace and PVC names in both clusters is safe because each cluster has its own Kubernetes API and storage backend.
References:
Scripted Three-Environment Variant
If you already have three Brev single-node Kubernetes environments named
server, site-1, and site-2, the helper scripts below automate the
same provisioning, deploy prepare, copy, PVC staging, and Helm install flow for
a server plus two clients:
Run the prepare script from a local NVFlare checkout with an external server host name and an image that all Brev clusters can pull:
export SERVER_HOST=server1.example.com
export IMAGE=registry.example.com/nvflare:dev
bash docs/user_guide/admin_guide/deployment/brev_scripts/prepare_brev_startup_kits.sh
If your Brev environment names differ from the participant names, set them with environment variables or ask the script to prompt for them:
SERVER_BREV=nvflare-server-k8s \
SITE_1_BREV=nvflare-site-1-k8s \
SITE_2_BREV=nvflare-site-2-k8s \
bash docs/user_guide/admin_guide/deployment/brev_scripts/prepare_brev_startup_kits.sh

bash docs/user_guide/admin_guide/deployment/brev_scripts/prepare_brev_startup_kits.sh \
  --prompt-brev-names
Then run the launch script inside each Brev environment:
brev shell "${SERVER_BREV:-server}"
IMAGE="$IMAGE" bash /home/ubuntu/launch_brev_nvflare.sh server

brev shell "${SITE_1_BREV:-site-1}"
IMAGE="$IMAGE" SERVER_HOST="$SERVER_HOST" bash /home/ubuntu/launch_brev_nvflare.sh site-1

brev shell "${SITE_2_BREV:-site-2}"
IMAGE="$IMAGE" SERVER_HOST="$SERVER_HOST" bash /home/ubuntu/launch_brev_nvflare.sh site-2
The current Brev CLI exposes brev port-forward for local forwarding, but it
does not provide a public TCP port exposure command. Use the Brev UI Access page
to expose TCP 8002 on the server environment before starting the two
sites.
Create Brev Kubernetes Environments
Create the server Kubernetes environment first, then repeat the same flow for
the client Kubernetes environment. In the Brev UI, a single-node Kubernetes
environment is created from the same GPUs page used for GPU and CPU
development environments.
Server Kubernetes Environment
Sign in to the Brev console.
Open
GPUsin the top navigation.Click
Create Environment.
Start from the Brev
GPUspage and create a new environment.Select the hardware for the server environment. A CPU instance is enough for the FLARE server unless your server-side workflow requires GPU compute.
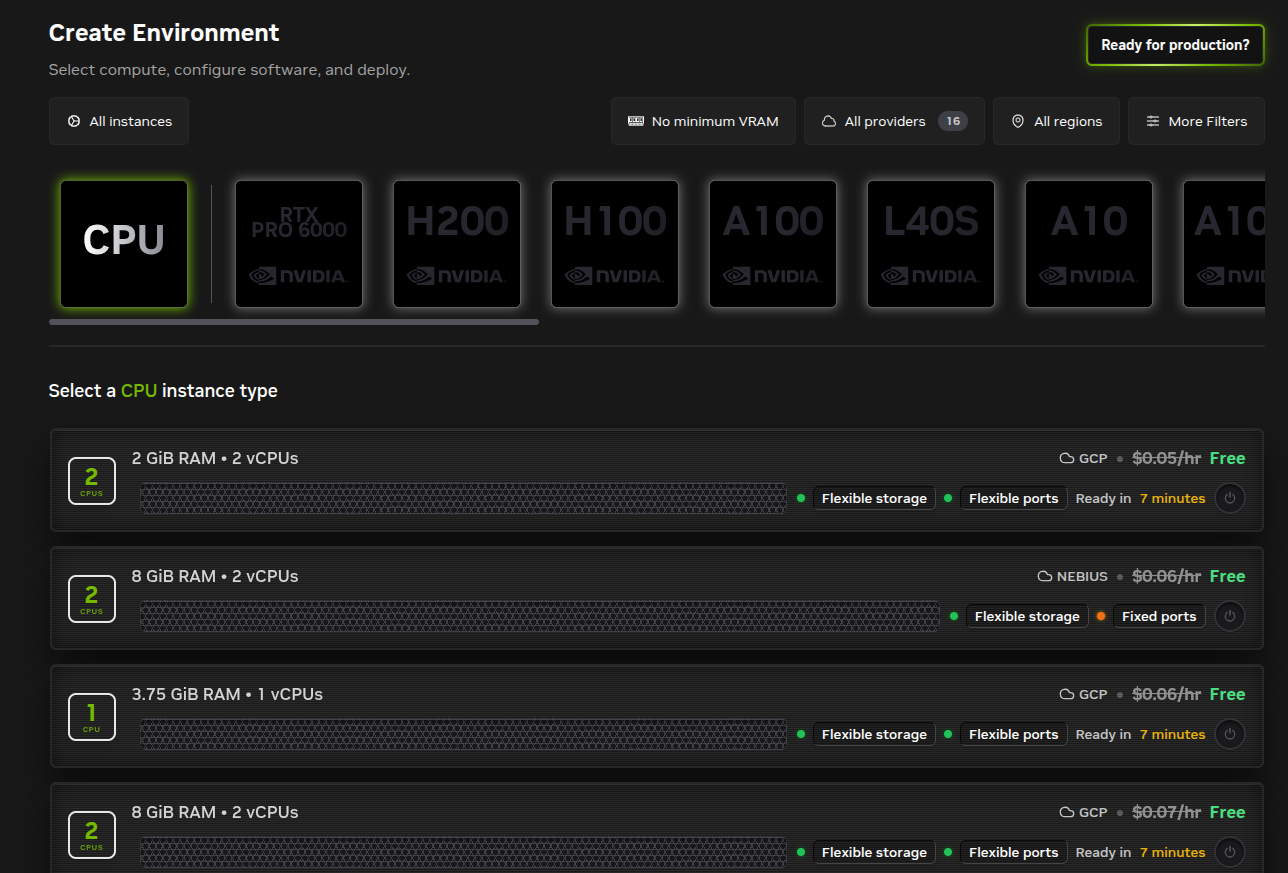
Select a CPU or GPU instance type. For a basic server deployment, a CPU instance type is sufficient.
Configure storage and region:
Name:nvflare-server-k8s.OrganizationorProject: choose the Brev organization that should own the environment.ProviderorCloud: choose the cloud provider where the server should run.Region: choose a region reachable by the client cluster and by your admin operator.Disk Storage: choose enough space for the container image cache, the provisioned workspace PVC, server job storage, snapshots, and logs.
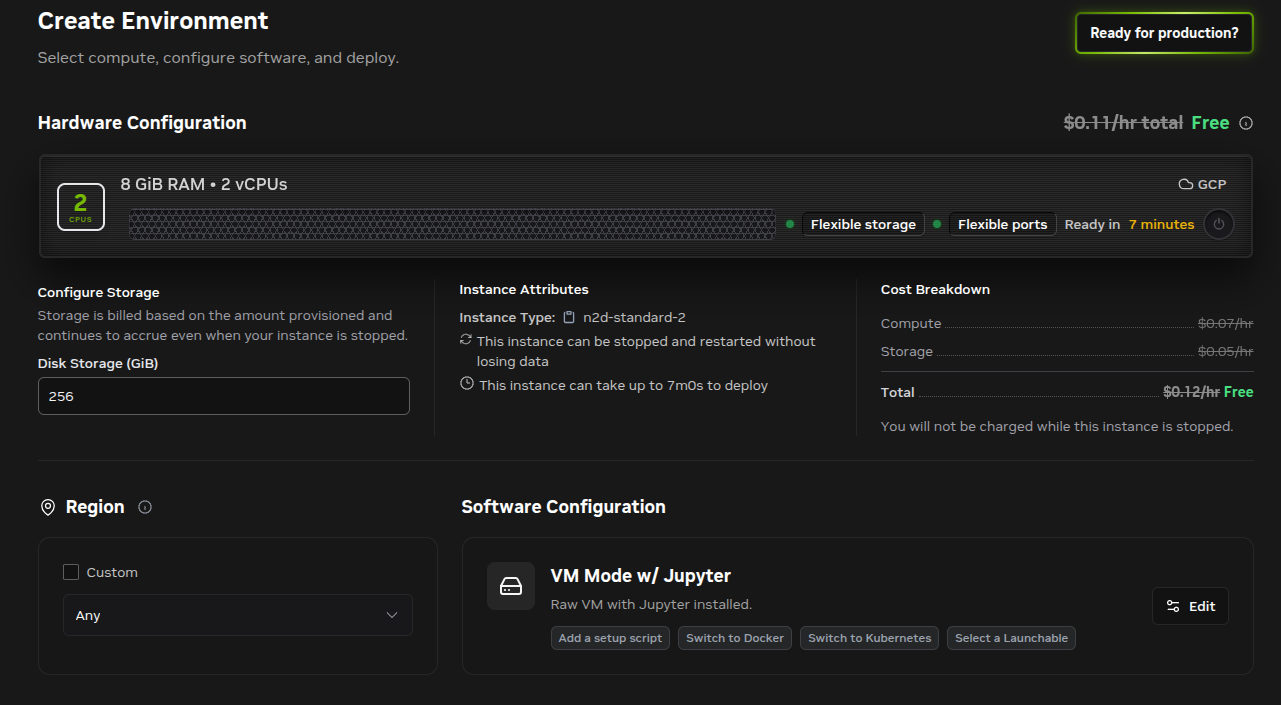
Configure disk storage and region before changing the software mode.
In
Software Configuration, clickEdit.Select
Single-node Kubernetes.Keep
Install Kubernetes Dashboardenabled if you want browser access to the cluster dashboard.Leave
Run a cluster init scriptdisabled unless your organization has a required initialization script.Click
Apply.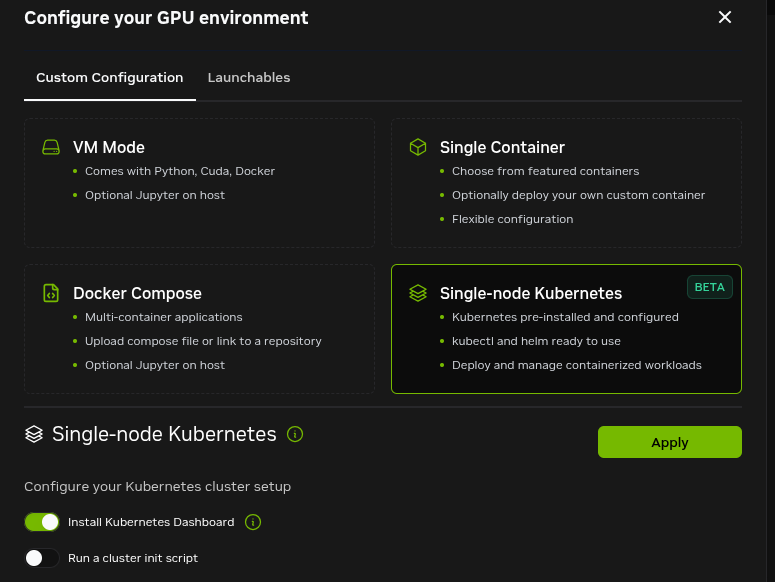
Choose
Single-node Kubernetesso the environment is created with Kubernetes,kubectl, andhelmready to use.Expand
Advancedonly if you need to set custom network or startup options.Set
Name Instancetonvflare-server-k8s.Click
Deploy.
Name the server environment and deploy it.
Wait until the environment status is
RunningorReady.
Client Kubernetes Environment
Repeat the same web UI flow and use these values:
Name:nvflare-site-1-k8s.Instance Type: choose CPU or GPU compute based on the jobs thatsite-1will run.Networking: the client cluster needs outbound access toserver1.example.com:8002.Disk Storage: choose enough space for the client workspace, logs, and data PVC.Software Configuration: chooseSingle-node Kubernetes.Ports: no inbound FLARE port is required for this basic client deployment. The client connects outbound to the server on8002.
Enable Server Port Access and SSH
After both Kubernetes environments are running, open the server environment’s
Access page. In the Using Ports section, expose the FLARE federated
learning port, fed_learn_port 8002:
This guide does not set admin_port in project.yml. When admin_port
is omitted, NVFlare uses the same value as fed_learn_port. Therefore, the
Brev server environment only needs to expose fed_learn_port 8002.
Find
TCP/UDP Ports.In
Expose Port(s), enter8002.Select the access scope.
Allow All IPsis convenient for a quick test; restrict this to known client/admin source IPs for a real deployment.Click
Expose Port.Confirm that the table lists port
8002and shows a public endpoint such as<server-ip>:8002.
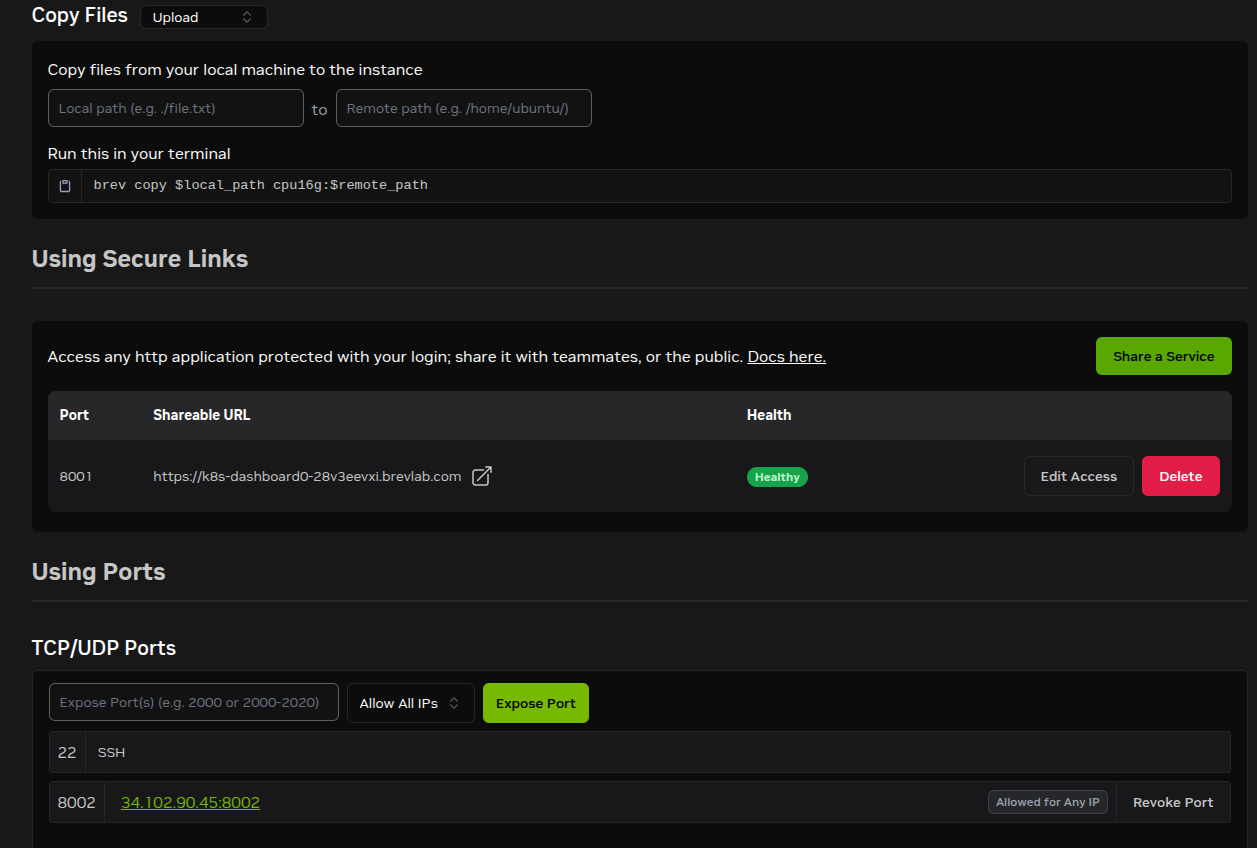
In Using Ports, expose the server fed_learn_port 8002. The same
page also shows the brev copy command format for uploading files to an
environment.
Copy the public host:port value for port 8002. Point
server1.example.com to the host/IP portion of that endpoint. Do not include
the port in default_host; the port is already configured as
fed_learn_port: 8002 in project.yml.
The environment also provides SSH instructions through the Access page:

Use the Brev CLI commands shown in the UI to install the CLI, log in, and open a shell on the Kubernetes environment.
Install and authenticate the Brev CLI on your local workstation if it is not already available:
sudo bash -c "$(curl -fsSL https://raw.githubusercontent.com/brevdev/brev-cli/main/bin/install-latest.sh)"
brev login
Set environment variables on your local workstation for the rest of the guide:
export SERVER_BREV=nvflare-server-k8s
export CLIENT_BREV=nvflare-site-1-k8s
export NAMESPACE=nvflare
export SERVER_HOST=server1.example.com
export IMAGE=registry.example.com/nvflare:dev
Verify that you can SSH to both Brev Kubernetes environments:
brev shell "$SERVER_BREV"
exit
brev shell "$CLIENT_BREV"
exit
Inside each Brev Kubernetes environment, kubectl and helm should already
be configured for the local single-node cluster. You can verify this after SSH:
kubectl get nodes
kubectl get storageclass
Build and Push the FLARE Image
Build the FLARE runtime image from an NVFlare source checkout and push it to a registry that both Brev Kubernetes clusters can pull from:
The ServerK8sJobLauncher and ClientK8sJobLauncher use the Kubernetes
Python client from inside the running FLARE container. If you use a custom
Dockerfile, install the dependency in the image:
RUN pip install kubernetes
The repository docker/Dockerfile.parent already installs the NVFlare
K8S extra, which includes this dependency. Keep that install line, or add
the explicit pip install kubernetes line above before building your image.
docker build -t "$IMAGE" -f docker/Dockerfile.parent .
docker push "$IMAGE"
If the registry is private, make sure both clusters can pull the image. Depending
on your registry and cluster configuration, this can mean configuring node-level
registry credentials or adding Kubernetes image pull secrets. The generated
chart does not add imagePullSecrets by default, so use a registry already
trusted by the nodes or customize the chart for your environment.
Edit project.yml
Generate a sample project file if you do not already have one:
nvflare provision -g
Edit project.yml with these deployment-specific goals:
Define only one client,
site-1.Set the server
default_hostto the stable external DNS name that the client cluster will use.Include the same DNS name in
host_namesso the server certificate is valid for that endpoint.Leave
admin_portunset so it defaults tofed_learn_port. The Brev server only needs to expose thefed_learn_portvalue.Use
nvflare deploy prepareafter provisioning to generate Kubernetes runtime files from the server and client startup kits.Use a container image that both clusters can pull in the deploy prepare runtime config.
Example:
api_version: 3
name: example_project
description: NVFlare Brev Kubernetes Helm deployment

participants:
  - name: server1
    type: server
    org: nvidia
    default_host: server1.example.com
    host_names:
      - server1
      - server1.example.com
    fed_learn_port: 8002
  - name: site-1
    type: client
    org: nvidia
  - name: admin@nvidia.com
    type: admin
    org: nvidia
    role: project_admin

builders:
  - path: nvflare.lighter.impl.workspace.WorkspaceBuilder
    args:
      template_file:
        - master_template.yml
  - path: nvflare.lighter.impl.static_file.StaticFileBuilder
    args:
      config_folder: config
      scheme: tcp
  - path: nvflare.lighter.impl.cert.CertBuilder
  - path: nvflare.lighter.impl.signature.SignatureBuilder
The value of default_host must be chosen before provisioning because it is
written into startup configuration and server certificates. Use a stable DNS
name that you control, such as server1.example.com, in project.yml and
point that DNS name to the Brev server environment’s exposed host after you
enable port access.
The generated server and client charts mount only the configured
workspace_pvc. In this guide, that PVC is nvflws and it is mounted at
/var/tmp/nvflare/workspace. Create separate data PVCs, such as
nvfldata, only for launched Kubernetes job pods that need study data.
Run Provisioning
Run the provision command:
nvflare provision -p project.yml -w /tmp/nvflare/provision
Set PROD_DIR to the generated production folder:
PROJECT_NAME=$(grep '^name:' project.yml | awk '{print $2}')
PROD_DIR=$(find "/tmp/nvflare/provision/${PROJECT_NAME}" \
  -maxdepth 1 -type d -name 'prod_*' | sort | tail -n 1)
if [ -z "$PROD_DIR" ]; then
  echo "No prod_* folder found for project '${PROJECT_NAME}'" >&2
  exit 1
fi
echo "$PROD_DIR"
Prepare the server and client startup kits for Kubernetes:
cat >/tmp/nvflare-k8s.yaml <<'EOF'
runtime: k8s
namespace: nvflare
parent:
  docker_image: registry.example.com/nvflare:dev
  parent_port: 8102
  workspace_pvc: nvflws
  workspace_mount_path: /var/tmp/nvflare/workspace
  python_path: /usr/local/bin/python3
job_launcher:
  config_file_path:
  default_python_path: /usr/local/bin/python3
  pending_timeout: 300
EOF

nvflare deploy prepare "$PROD_DIR/server1" --output /tmp/nvflare-prepared/server1 --config /tmp/nvflare-k8s.yaml
nvflare deploy prepare "$PROD_DIR/site-1" --output /tmp/nvflare-prepared/site-1 --config /tmp/nvflare-k8s.yaml
The example above only sets the keys this guide needs. parent also accepts
optional resources (parent pod CPU/memory requests and limits) and
pod_security_context, and job_launcher accepts optional
job_pod_security_context. See Deploy Command for the full
runtime config schema and Running FLARE in Kubernetes for how the prepared chart is
installed.
The prepared folders should contain one helm_chart directory under the
server and client:
ls /tmp/nvflare-prepared/server1/helm_chart
ls /tmp/nvflare-prepared/site-1/helm_chart
Each participant folder has this structure:
server1/
  helm_chart/
    Chart.yaml
    values.yaml
    templates/
  local/
  startup/
  transfer/
During this step, nvflare deploy prepare updates
local/resources.json.default to use the Kubernetes launcher, removes any
active local/resources.json override, updates runtime communication to use
the generated Kubernetes Service, creates a local/study_data.yaml template
when needed, removes the legacy startup/start.sh, startup/sub_start.sh,
and startup/stop_fl.sh scripts (the parent process is launched by the Helm
chart instead), and generates helm_chart/. For server kits, it also
relocates the default job_manager and snapshot_persistor storage paths
under parent.workspace_mount_path
(/var/tmp/nvflare/workspace/jobs-storage and
/var/tmp/nvflare/workspace/snapshot-storage) so server job history and
snapshots persist on the workspace PVC. Do not edit the launcher in
resources.json.default by hand after this step; change
/tmp/nvflare-k8s.yaml and rerun nvflare deploy prepare instead.
If the input kit already configures a custom resource_manager,
resource_consumer, or job launcher, nvflare deploy prepare prints a
warning and replaces those components with the runtime configuration shown
above.
Copy Prepared Kits to Brev Environments
Package the prepared server and client folders on your local workstation:
tar -czf /tmp/nvflare-server1.tgz -C /tmp/nvflare-prepared server1
tar -czf /tmp/nvflare-site-1.tgz -C /tmp/nvflare-prepared site-1
Use the Copy Files section of the Brev environment Access page, or run
the equivalent brev copy commands:
brev copy /tmp/nvflare-server1.tgz "$SERVER_BREV:/home/ubuntu/"
brev copy /tmp/nvflare-site-1.tgz "$CLIENT_BREV:/home/ubuntu/"
The archive contains the generated startup/, local/, and
helm_chart/ folders. The Helm chart is run from the Brev environment after
the archive is extracted. Only startup/ and local/ need to be staged in
the workspace PVC.
Deploy the Server Environment
Open a shell on the server Brev environment:
brev shell "$SERVER_BREV"
Run the rest of this section from inside the server environment. First extract the uploaded archive and set deployment variables:
export NAMESPACE=nvflare
export IMAGE=registry.example.com/nvflare:dev

mkdir -p ~/nvflare
tar -xzf ~/nvflare-server1.tgz -C ~/nvflare
kubectl get nodes
helm version
Create the namespace and PVCs. The generated server chart requires the
nvflws workspace PVC. The nvfldata PVC is used later only by launched
Kubernetes job pods that need study data:
kubectl create namespace "$NAMESPACE" --dry-run=client -o yaml | kubectl apply -f -

cat > ~/nvflare/nvflare-pvcs.yaml <<'EOF'
apiVersion: v1
kind: PersistentVolumeClaim
metadata:
  name: nvflws
spec:
  accessModes:
    - ReadWriteOnce
  resources:
    requests:
      storage: 10Gi
---
apiVersion: v1
kind: PersistentVolumeClaim
metadata:
  name: nvfldata
spec:
  accessModes:
    - ReadWriteOnce
  resources:
    requests:
      storage: 50Gi
EOF

kubectl -n "$NAMESPACE" apply -f ~/nvflare/nvflare-pvcs.yaml
kubectl -n "$NAMESPACE" get pvc
If your Brev Kubernetes environment does not have a default storage class, add
storageClassName: <storage-class-name> under each PVC spec.
The server folder is already prepared for Kubernetes. Its
local/resources.json.default contains ServerK8sJobLauncher with
namespace: nvflare, default_python_path: /usr/local/bin/python3,
pending_timeout: 300, and workspace_mount_path:
/var/tmp/nvflare/workspace from /tmp/nvflare-k8s.yaml. The same namespace
must be used for the Helm release because the launcher creates dynamic job pods
in that namespace.
Copy the prepared server startup/ and local/ directories into the
nvflws PVC. The chart starts the server with
-m /var/tmp/nvflare/workspace, so the PVC root must contain startup/
and local/ directly.
cat > ~/nvflare/copy-to-pvcs.yaml <<'EOF'
apiVersion: v1
kind: Pod
metadata:
  name: nvflare-pvc-copy
spec:
  restartPolicy: Never
  containers:
    - name: copy
      image: busybox:1.36
      command:
        - sh
        - -c
        - sleep 3600
      volumeMounts:
        - name: nvflws
          mountPath: /mnt/nvflws
  volumes:
    - name: nvflws
      persistentVolumeClaim:
        claimName: nvflws
EOF

kubectl -n "$NAMESPACE" delete pod nvflare-pvc-copy --ignore-not-found=true
kubectl -n "$NAMESPACE" apply -f ~/nvflare/copy-to-pvcs.yaml
kubectl -n "$NAMESPACE" wait \
  --for=condition=Ready pod/nvflare-pvc-copy --timeout=120s
kubectl -n "$NAMESPACE" exec nvflare-pvc-copy -- \
  rm -rf /mnt/nvflws/startup /mnt/nvflws/local
kubectl -n "$NAMESPACE" cp ~/nvflare/server1/startup nvflare-pvc-copy:/mnt/nvflws/startup
kubectl -n "$NAMESPACE" cp ~/nvflare/server1/local nvflare-pvc-copy:/mnt/nvflws/local
kubectl -n "$NAMESPACE" exec nvflare-pvc-copy -- \
  ls -la /mnt/nvflws/startup /mnt/nvflws/local
kubectl -n "$NAMESPACE" delete pod nvflare-pvc-copy
Copy startup/ and local/ directly into the PVC root. If the PVC root
only contains a nested server1/ directory, the server pod will not find
/var/tmp/nvflare/workspace/startup and
/var/tmp/nvflare/workspace/local.
Install the server Helm chart. Set hostPortEnabled=true so the server pod
binds fed_learn_port 8002 on the Brev host. This is the port exposed in
the Brev Using Ports UI.
helm upgrade --install server1 ~/nvflare/server1/helm_chart \
  --namespace "$NAMESPACE" \
  --set image.repository="${IMAGE%:*}" \
  --set image.tag="${IMAGE##*:}" \
  --set service.type=ClusterIP \
  --set hostPortEnabled=true

kubectl -n "$NAMESPACE" rollout status deployment/server1 --timeout=300s
kubectl -n "$NAMESPACE" get pods
kubectl -n "$NAMESPACE" logs deploy/server1
Deploy the site-1 Environment
Open a shell on the client Brev environment:
brev shell "$CLIENT_BREV"
Run the rest of this section from inside the client environment. First extract the uploaded archive and set deployment variables:
export NAMESPACE=nvflare
export IMAGE=registry.example.com/nvflare:dev
export SERVER_HOST=server1.example.com

mkdir -p ~/nvflare
tar -xzf ~/nvflare-site-1.tgz -C ~/nvflare
kubectl get nodes
helm version
Create the namespace and PVCs. The generated client chart requires the
nvflws workspace PVC. The nvfldata PVC is used later only by launched
Kubernetes job pods that need study data:
kubectl create namespace "$NAMESPACE" --dry-run=client -o yaml | kubectl apply -f -

cat > ~/nvflare/nvflare-pvcs.yaml <<'EOF'
apiVersion: v1
kind: PersistentVolumeClaim
metadata:
  name: nvflws
spec:
  accessModes:
    - ReadWriteOnce
  resources:
    requests:
      storage: 10Gi
---
apiVersion: v1
kind: PersistentVolumeClaim
metadata:
  name: nvfldata
spec:
  accessModes:
    - ReadWriteOnce
  resources:
    requests:
      storage: 50Gi
EOF

kubectl -n "$NAMESPACE" apply -f ~/nvflare/nvflare-pvcs.yaml
kubectl -n "$NAMESPACE" get pvc
The site-1 folder is already prepared for Kubernetes. Its
local/resources.json.default contains ClientK8sJobLauncher with the
same launcher settings from /tmp/nvflare-k8s.yaml. Keep the Helm namespace
consistent with the namespace value used by nvflare deploy prepare.
Copy the prepared site-1 startup/ and local/ directories into the
client nvflws PVC:
cat > ~/nvflare/copy-to-pvcs.yaml <<'EOF'
apiVersion: v1
kind: Pod
metadata:
  name: nvflare-pvc-copy
spec:
  restartPolicy: Never
  containers:
    - name: copy
      image: busybox:1.36
      command:
        - sh
        - -c
        - sleep 3600
      volumeMounts:
        - name: nvflws
          mountPath: /mnt/nvflws
  volumes:
    - name: nvflws
      persistentVolumeClaim:
        claimName: nvflws
EOF

kubectl -n "$NAMESPACE" delete pod nvflare-pvc-copy --ignore-not-found=true
kubectl -n "$NAMESPACE" apply -f ~/nvflare/copy-to-pvcs.yaml
kubectl -n "$NAMESPACE" wait \
  --for=condition=Ready pod/nvflare-pvc-copy --timeout=120s
kubectl -n "$NAMESPACE" exec nvflare-pvc-copy -- \
  rm -rf /mnt/nvflws/startup /mnt/nvflws/local
kubectl -n "$NAMESPACE" cp ~/nvflare/site-1/startup nvflare-pvc-copy:/mnt/nvflws/startup
kubectl -n "$NAMESPACE" cp ~/nvflare/site-1/local nvflare-pvc-copy:/mnt/nvflws/local
kubectl -n "$NAMESPACE" exec nvflare-pvc-copy -- \
  ls -la /mnt/nvflws/startup /mnt/nvflws/local
kubectl -n "$NAMESPACE" delete pod nvflare-pvc-copy
Before installing the client chart, verify that the client environment can resolve the server host:
kubectl -n "$NAMESPACE" run dns-test --rm -it \
  --image=busybox:1.36 -- \
  nslookup "$SERVER_HOST"
Install the site-1 Helm chart:
helm upgrade --install site-1 ~/nvflare/site-1/helm_chart \
  --namespace "$NAMESPACE" \
  --set image.repository="${IMAGE%:*}" \
  --set image.tag="${IMAGE##*:}"

kubectl -n "$NAMESPACE" rollout status deployment/site-1 --timeout=300s
kubectl -n "$NAMESPACE" get pods
kubectl -n "$NAMESPACE" logs deploy/site-1
If you reprovision later, back up or remove old PVC contents before copying the new folders. Certificates, local config, and communication settings are tied to the provisioned project state.
Connect an Admin Console
Run the admin client from a network location that can reach
server1.example.com:8002:
cd "$PROD_DIR/admin@nvidia.com/startup"
./fl_admin.sh
The generated admin kit connects to the server host configured in
project.yml. If you used server1.example.com as default_host, that
name must resolve to the Brev server environment endpoint.
Kubernetes Job Pods and nvfldata
nvflare deploy prepare writes the Kubernetes launcher into
local/resources.json.default before the participant folders are copied to
Brev. The generated launcher config sets study_data_pvc_file_path to:
/var/tmp/nvflare/workspace/local/study_data.yaml
When launched job pods need the nvfldata PVC, edit
local/study_data.yaml in the prepared server and client folders before
copying those folders into nvflws. This example maps the default study’s
data dataset to nvfldata:
default:
  data:
    source: nvfldata
    mode: rw
Job pod image, Python, CPU, memory, and ephemeral storage settings should be
specified in the submitted job’s meta.json under launcher_spec for the
k8s launcher. GPU resource requests such as num_of_gpus should be
specified under resource_spec, matching Running FLARE in Kubernetes.
Troubleshooting
PVC stays Pending
Check that the Brev cluster has a default storage class, or add an explicit
storageClassName to nvflare-pvcs.yaml:
kubectl get storageclass
kubectl -n "$NAMESPACE" describe pvc nvflws
Pod has ImagePullBackOff
Confirm the image exists and that both clusters can pull it:
docker push "$IMAGE"
kubectl -n "$NAMESPACE" describe pod -l app.kubernetes.io/name=server1
kubectl -n "$NAMESPACE" describe pod -l app.kubernetes.io/name=site-1
Server pod cannot find startup or local
The participant folder was copied to the wrong level in the PVC. The server workspace root must contain:
/var/tmp/nvflare/workspace/startup
/var/tmp/nvflare/workspace/local
Use the helper pod to inspect /mnt/nvflws and restage startup/ and
local/ from the extracted prepared folder, such as
~/nvflare/server1/startup and ~/nvflare/server1/local, if needed.
site-1 cannot connect to the server
Verify these items:
default_hostinproject.ymlmatches the DNS name used by the client.The DNS name resolves from the client cluster.
The server cluster exposes TCP port
8002.The server certificate includes the DNS name in
host_names.
Run a DNS check from the client cluster:
kubectl -n "$NAMESPACE" run dns-test --rm -it \
  --image=busybox:1.36 -- \
  nslookup "$SERVER_HOST"
If you change default_host or host_names, reprovision, restage the
updated folders, and redeploy the charts.
Cleanup
Remove the Helm releases:
# Run inside the server Brev environment.
helm uninstall server1 -n "$NAMESPACE"

# Run inside the site-1 Brev environment.
helm uninstall site-1 -n "$NAMESPACE"
Delete the namespaces and PVCs:
# Run inside each Brev environment.
kubectl delete namespace "$NAMESPACE"
Delete the Brev clusters from the web UI when you no longer need them:
Open the Brev console.
Open the Kubernetes or clusters page.
Select
nvflare-server-k8sand delete it.Select
nvflare-site-1-k8sand delete it.Confirm in the billing or usage page that the resources are no longer running.