Getting Started
This Getting Started guide is geared towards new users of NVIDIA FLARE and walks through installation, the FL Simulator, and a simple “hello world” application.
Once you’re familiar with the platform, the Example Applications are a great next step. These examples introduce some of the key concepts of the platform and showcase the integration of popular libraries and frameworks like Numpy, Pytorch, Tensorflow, and MONAI.
Any FLARE application used with the FL Simulator can also be run in a real-world, distributed FL deployment. The Real-World FL section describes some of the considerations and tools used for establishing a secure, distributed FL workflow.
Installation
Python Version
NVIDIA FLARE requires Python 3.8. It may work with Python 3.7 but currently is not compatible with Python 3.9 and above.
Install NVIDIA FLARE in a virtual environment
It is highly recommended to install NVIDIA FLARE in a virtual environment if you are not using Containerized Deployment with Docker. This guide briefly describes how to create a virtual environment with venv.
Virtual Environments and Packages
Python’s official document explains the main idea about virtual environments. The module used to create and manage virtual environments is called venv. You can find more information there. We only describe a few necessary steps for a virtual environment for NVIDIA FLARE.
Depending on your OS and the Python distribution, you may need to install the Python’s venv package separately. For example, in Ubuntu 20.04, you need to run the following commands to continue creating a virtual environment with venv. Note that in newer versions of Ubuntu, you may need to make sure you are using Python 3.8 and not a newer version.
$ sudo apt update
$ sudo apt-get install python3-venv
Once venv is installed, you can use it to create a virtual environment with:
$ python3 -m venv nvflare-env
This will create the nvflare-env directory in current working directory if it doesn’t exist,
and also create directories inside it containing a copy of the Python interpreter,
the standard library, and various supporting files.
Activate the virtualenv by running the following command:
$ source nvflare-env/bin/activate
You may find that the pip and setuptools versions in the venv need updating:
(nvflare-env) $ python3 -m pip install -U pip
(nvflare-env) $ python3 -m pip install -U setuptools
Install Stable Release
Stable releases are available on NVIDIA FLARE PyPI:
$ python3 -m pip install nvflare
Containerized Deployment with Docker
Running NVIDIA FLARE in a Docker container is sometimes a convenient way to ensure a uniform OS and software environment across client and server systems. This can be used as an alternative to the bare-metal Python virtual environment described above and will use a similar installation to simplify transitioning between a bare metal and containerized environment.
To get started with a containerized deployment, you will first need to install a supported container runtime and the NVIDIA Container Toolkit to enable support for GPUs. System requirements and instructions for this can be found in the NVIDIA Container Toolkit Install Guide <https://docs.nvidia.com/datacenter/cloud-native/container-toolkit/install-guide.html>.
A simple Dockerfile is used to capture the base requirements and dependencies. In
this case, we’re building an environment that will support PyTorch-based workflows,
in particular the Hello PyTorch with Tensorboard Streaming
example. The base for this build is the NGC PyTorch container. On this base image,
we will install the necessary dependencies and clone the NVIDIA FLARE GitHub
source code into the root workspace directory. To create a Dockerfile, create a file named Dockerfile
using any text editor and include the following:
ARG PYTORCH_IMAGE=nvcr.io/nvidia/pytorch:22.09-py3
FROM ${PYTORCH_IMAGE}

RUN python3 -m pip install -U pip
RUN python3 -m pip install -U setuptools
RUN python3 -m pip install torch torchvision tensorboard nvflare

WORKDIR /workspace/
RUN git clone https://github.com/NVIDIA/NVFlare.git
We can then build the new container by running docker build in the directory containing this Dockerfile, for example tagging it nvflare-pt:
docker build -t nvflare-pt .
This will result in a docker image, nvflare-pt:latest. You can run this container with Docker,
in this example mounting a local my-workspace directory into the container for use as a persistent
workspace:
mkdir my-workspace
docker run --rm -it --gpus all \
    --ipc=host --ulimit memlock=-1 --ulimit stack=67108864 \
    -w $(pwd -P)/my-workspace:/workspace/my-workspace \
    nvflare-pt:latest
Once the container is running, you can also exec into the container, for example if you need another
terminal to start additional FLARE clients. First find the CONTAINER ID using docker ps, and then
use that ID to exec into the container:
docker ps  # use the CONTAINER ID in the output
docker exec -it <CONTAINER ID> /bin/bash
This container can be used to run the FL Simulator or any FL server or client. When using the FL Simulator (described in the next section), you can simply mount in any directories needed for your FLARE application code, and run the Simulator within the Docker container with all dependencies installed.
The FL Simulator
After installing the nvflare pip package, you have access to the NVFlare CLI including the FL Simulator. The Simulator allows you to start a FLARE server and any number of connected clients on your local workstation or laptop, and to quickly deploy an application for testing and debugging.
Basic usage for the FL Simulator is available with nvflare simulator -h:
$ nvflare simulator -h
usage: nvflare simulator [-h] [-w WORKSPACE] [-n N_CLIENTS] [-c CLIENTS] [-t THREADS] [-gpu GPU] [-m MAX_CLIENTS] job_folder

positional arguments:
  job_folder

optional arguments:
  -h, --help            show this help message and exit
  -w WORKSPACE, --workspace WORKSPACE
                        WORKSPACE folder
  -n N_CLIENTS, --n_clients N_CLIENTS
                        number of clients
  -c CLIENTS, --clients CLIENTS
                        client names list
  -t THREADS, --threads THREADS
                        number of parallel running clients
  -gpu GPU, --gpu GPU   list of GPU Device Ids, comma separated
  -m MAX_CLIENTS, --max_clients MAX_CLIENTS
                        max number of clients
Before we get into the Simulator, we’ll walk through a few additional setup steps in the next section required to run an example application.
Running an example application
Any of the Example Applications can be used with the FL Simulator. We’ll demonstrate the steps here using the hello-pt-tb example.
First, we need to clone the NVFlare repo to get the source code for the examples:
$ git clone https://github.com/NVIDIA/NVFlare.git
We can then copy the necessary files (the exercise code in the examples directory of the NVFlare repository) to a working directory:
mkdir simulator-example
cp -rf NVFlare/examples/hello-pt-tb simulator-example/
The hello-pt-tb application requires a few dependencies to be installed. As in the installation section, we can install these in the Python virtual environment by running:
source nvflare-env/bin/activate
python3 -m pip install torch torchvision tensorboard
If using the Dockerfile above to run in a container, these dependencies have already been installed.
Next, we can create a workspace for the Simulator to use for outputs of the application run, and launch
the simulator using simulator-example/hello-pt-tb as the input job directory. In this example, we’ll
run on two clients using two threads:
mkdir simulator-example/workspace
nvflare simulator -w simulator-example/workspace -n 2 -t 2 simulator-example/hello-pt-tb
Now you will see output streaming from the server and client processes as they execute the federated application. Once the run completes, your workspace directory will contain the input application configuration and codes, logs of the output, site and global models, cross-site validation results, and in this example the Tensorboard event files.
$ tree -L 3 simulator-example/workspace/
simulator-example/workspace/
├── audit.log
├── local
    │  └── log.config
    ├── simulate_job
    │  ├── app_server
    │  │   ├── config
    │  │   ├── custom
    │  │   └── FL_global_model.pt
    │  ├── app_site-1
    │  │   ├── audit.log
    │  │   ├── config
    │  │   ├── custom
    │  │   └── log.txt
    │  ├── app_site-2
    │  │   ├── audit.log
    │  │   ├── config
    │  │   ├── custom
    │  │   └── log.txt
    │  ├── cross_site_val
    │  │   ├── cross_val_results.json
    │  │   ├── model_shareables
    │  │   └── result_shareables
    │  ├── log.txt
    │  ├── models
    │  │   └── local_model.pt
    │  └── tb_events
    │      ├── site-1
    │      └── site-2
    └── startup
We can view the training performance for the two sites by launching Tensorboard:
tensorboard --logdir simulator-example/workspace/simulate_job/tb_events
For this example run over 5 epochs, the training loss:
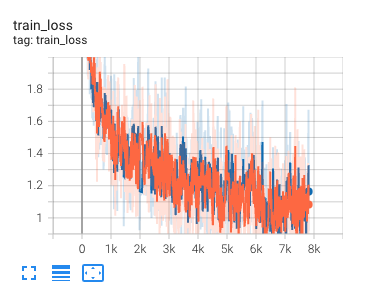
Tensorboard graph showing train_loss for two sites in the hello_pt_tb example.
Now that we’ve explored an example application with the FL Simulator, we can look at what it takes to bring this type of application to a secure, distributed deployment in the Real World Federated Learning section.